Welcome to part 2 of the series, ‘Granular Licensing of Office 365 SKUs’. In Part 1 of this series, I discussed how to perform granular licensing of Office 365 SKUs via the Office 365 Admin Portal. We learned that there were some slick features on how to scope out user accounts and modify licensing. There were, however, some limitations.
In Part 2 of this series, we will perform a bulk edit of licensed user accounts by using PowerShell and upgrading the accounts from an E3 license to an E5 license while adding just a few features from the E5 suite. By using PowerShell, we can work beyond the limitations of the Portal and perform a bulk edit on a much larger batch of accounts.
Our goal for this license upgrade is the following:
- Upgrade user accounts from E3 to E5
- When upgrading to E5, our company wants us to only enable the following E5 services:
o Office 365 Advanced eDiscovery
o Sway
o Power BI Pro
The following assumptions have been made:
- All E3 licensed accounts have all services enabled that are available under the E3 license.
The first thing we want to do is connect to our Office 365 tenant and grab a report of all of our licensed users we may want to modify. If you have never connected to your Office 365 tenant via PowerShell, please follow the TechNet article here to get you started.
https://technet.microsoft.com/en-us/library/jj984289(v=exchg.160).aspx
Once you have met all the requirements and have connected to your Office 365 environment, you will then need to be able to use the MSOL cmdlets to perform licensing on your Office 365 accounts. To connect to the Office 365 MSOL service type the following in your Azure Power Shell Session:
- Connect-MsolService

After you type this command, a pop-up window will appear. You will want to provide the credentials of a Global Administrator account and click on ‘OK’. If all went well, you should now be connected to the Office 365 Msol service. You can check this by typing any of the Msol cmdlets. For our purpose, we will use the below cmdlet as we will need to record the output and use it later:
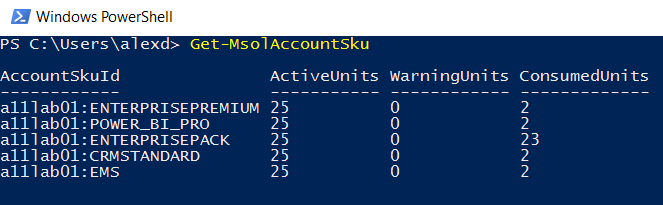
- Get-MsolAccountSku
*Note* Going forward, on any workstation where you already followed the TechNet article above, the next time you want to connect to your Office 365 tenant to use the MSOL cmdlets, you do not need to follow the TechNet article. You can simply open up your Azure Power Shell windows and type Connect-MsolSevice, and then provide the appropriate credentials.
You will notice from the output that a few different licenses are available in this tenant. Take note of the a11lab01:ENTERPRISEPREMIUM and the 11lab01:ENTERPRISEPACK as these relate to us for converting licenses from E3 to E5. Below is a list of what each SKU is:
- ENTERPRISEPREMIUM – E5 Licenses
- ENTERPRISEPACK – E3 Licenses
Now that you are connected to your Office 365 tenant, it is time to gather information about your user accounts and prepare a list in a csv file. The following script is what I like to run to collect all user information into a csv file:
- Get-MsolUser -All | Select DisplayName,userPrincipalname,isLicensed,BlockCredential,ValidationStatus,@{n="Licenses Type";e={$_.Licenses.AccountSKUid}} | Export-csv .\labUserExport.csv -NoTypeInformation
I like to add few extra columns in there that allow me to see other things like accounts which are not licensed, accounts currently disabled, or may potentially have an error in their validation status. The last column though shows me which account SKU the user account is currently using.
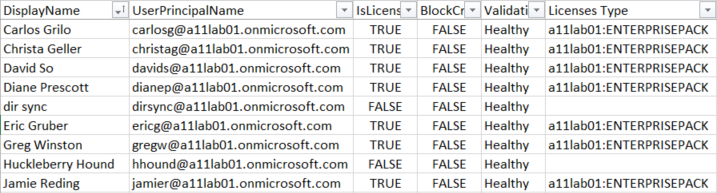
I can see from my output that there are a few accounts which I will not want to include namely the dir sync account and the Huckleberry Hound account. I will remove those two line entries and save the file as UserImport.csv.
I want to pause here for a moment to look at and highlight one of the motivating factors for which wrote this blog article. Up at the top I had defined our criteria as follows:
- Upgrade user accounts from E3 to E5
- When upgrading to E5, our company wants us to only enable the following E5 services:
o Office 365 Advanced eDiscovery
o Sway
o Power BI Pro
Let’s take a look for a moment at the options available in PowerShell. To review the granular service plans available for an E5 license, we must first import the E5 licenses into a variable:
- $ServicePlans = Get-MsolAccountSku | Where {$_.SkuPartNumber -eq "ENTERPRISEPREMIUM"}
Next, let us review what our service options by executing the following command:
- $ServicePlans.ServiceStatus
From our output, we can see the following:
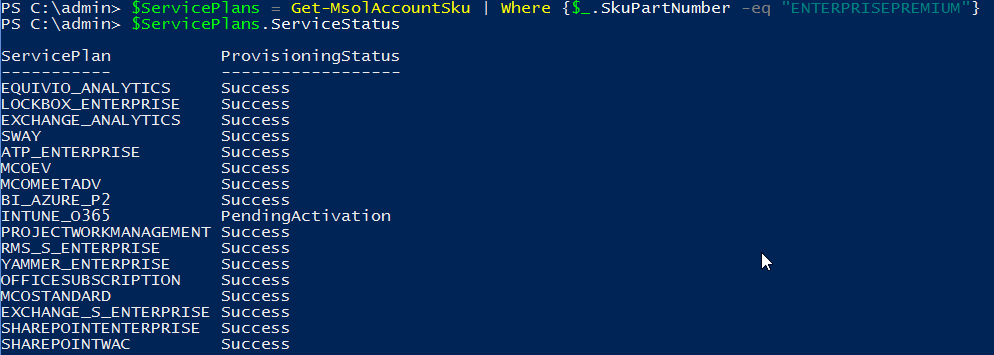
In this list we can find Sway, but which one is Power BI Pro and which one is Office 365 Advanced eDiscovery?
It was this frustration I came across that motivated me to create a matrix of what each individual service plan was and document them. Please see the below table I created which is a reference of service plans available in E3 and E5 in ‘PowerShell’ lingo.
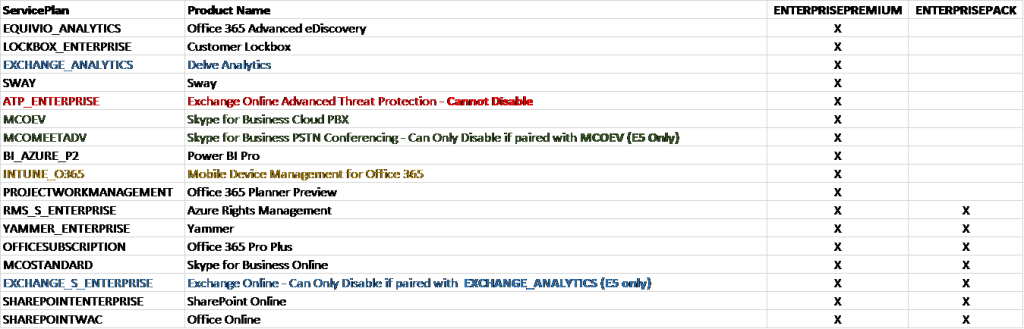
From the Service Plan to Product Name table, it is now much easier to understand which plans we need to disable when converting the license plan from E3 to E5. Since our requirements are for Sway, Power BI Pro, and Office 365 Advanced eDiscovery, we know we want to keep the Service Plans EQUIVIO_ANALYTICS, SWAY, and BI_AZURE_P2 and disable everything else.
A few side notes about some of the Service Plans, I noticed that not all of the plans could be enabled and disabled individually. Two of the Services could only be disabled if they were paired with another plan. You can see in the Product Name column I have documented what Service plans are paired together. Other observations made while testing was that the Exchange Online Advanced Threat Protection was not an optional feature you could disable, and that Mobile Device Management for Office 365 needed to be setup for before the feature could be enabled or disabled.
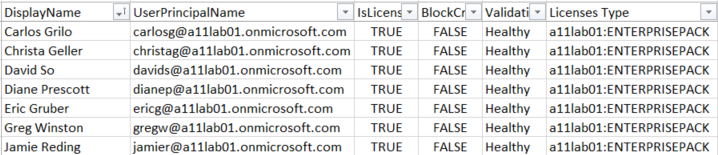
Ok, now that we have our user list modified and saved as userlist.csv, we are armed with the knowledge in PowerShell of what Service Plans we need to keep, and which Service Plans we need to disable in upgrading our users from an E3 license to an E5 license. Below is a snapshot of my modified list.
I will now import this list into a variable called $list to prepare the list for use by using the following cmd:
- $list = Import=Csv .\UserList.csv
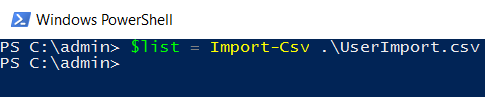
Now to verify the list I simply type $list | ft and hit <Enter>. If I had a very long list I could retype the command and pipe the $list to the measure cmdlet to verify my output numbers match my csv file.
Now to verify the list I simply type $list | ft and hit <Enter>. If I had a very long list I could retype the command and pipWe are almost ready to make the modification. But before we do, we must set one more variable with the Service Plans to disable using the New-MsolLicenseOptions cmdlet. Based on all the options available, I must set a variable to disable the following Service Plans:
- LOCKBOX_ENTERPRISE
- EXCHANGE_ANALYTICS
- MCOEV
- MCOMEETADV
- INTUNE_O365
- PROJECTWORKMANAGEMENT
The variable I will set will be named $OnlineSku
- $OnlineSku = New-MsolLicenseOptions -AccountSkuId a11ab01:ENTERPRISEPREMIUM -DisabledPlans LOCKBOX_ENTERPRISE,EXCHANGE_ANALYTICS,MCOEV,MCOMEETADV,INTUNE_O365,PROJECTWORKMANAGEMENT
Below is a sample command in PowerShell:

*Note* Be sure the account SKU you use for the –AccountSkuID is 100% correct based off of the Get-MsolAccountSku command.
We are now ready to bulk edit our user accounts. A WORD OF CAUTION – Please be sure to test this on a few test accounts and verify the results before you pull the trigger on all of your production users. Depending on the company and timing, this could be a resume generating event.
The PowerShell script I will run to modify my following user accounts will be as follows:
- $list | ForEach-Object {Set-MsolUserLicense -UserPrincipalName $_.UserPrincipalName -RemoveLicenses "a11lab01:ENTERPRISEPACK" -AddLicenses "a11lab01:ENTERPRISEPREMIUM" -LicenseOptions $OnlineSku}
How do you know this worked?
To verify results, log in to your Office 365 Admin Portal and view a random sample of the accounts modified. One of the accounts modified in the above list was David So. In the portal, I opened up David So’s account and licenses and verified the following:
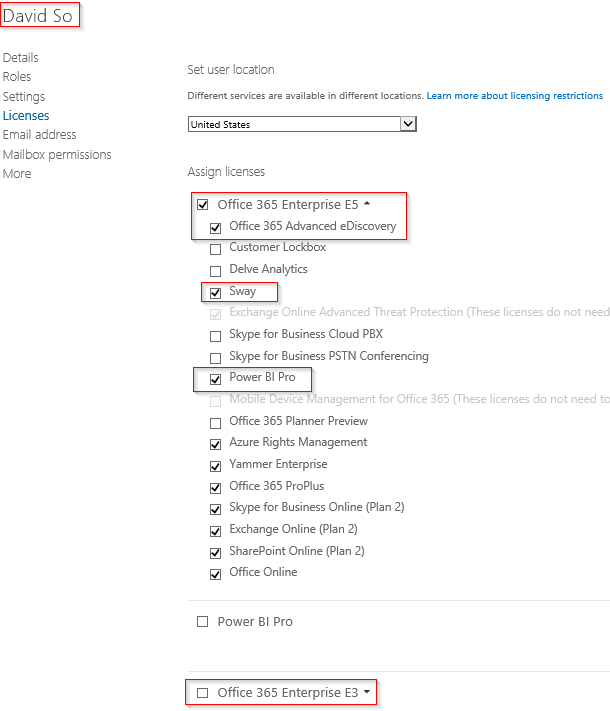
I can see in the above results it is exactly what we wanted based on the criteria given at the beginning.
In part 2 of this series we covered the upgrade of Office 365 licenses from E3 to E5 but with only a few Service Plans enabled. I hope in this blog I have given enough content to help you through your next Office 365 license upgrade project.
Written and composed by our Senior Microsoft Systems Engineer, Alex Levin.