Microsoft sensitivity labels are an effective and efficient way to ensure your data stays secure. They are customizable to the specific needs of your organization and let you select how data is restricted, from public-facing documents to highly-confidential materials.
What is sensitive data?
To begin using sensitivity labels, your organization must first define what is sensitive data to you.
Generally speaking, sensitive data is personal or business-related information that must be safeguarded to protect the privacy, security, and financial well-being of an individual or a company. This includes confidential or proprietary information that, if compromised, would put the company at a competitive disadvantage or cause financial loss, as well as personally identifiable information (PII), such as a social security number or date of birth.
Businesses make the sensitive information they store, manage and use only available to certain users, based on their data classification policy. This policy outlines who gets to access and use the information and how that information can be used.
Understanding Microsoft’s sensitivity labels for information protection
Let’s explore why organizations use sensitivity labels and how they work.
What are sensitivity labels?
Microsoft sensitivity labels are used to consistently protect business-related data throughout its lifecycle. When a sensitivity label is applied to a document or other data, it facilitates policy creation that automatically restricts how that data can be accessed and used, such as restricting access to certain teams or from specific devices.
These labels provide a consistent way to apply security controls to files and emails based on their sensitivity level and provide a framework that aligns with best practices for data protection. Often they are based on industry standards such as ISO and NIST.
How do sensitivity labels work?
Microsoft sensitivity labels assign a sensitivity level to data that can be used to automatically apply the appropriate level of protection. The sensitivity level is based on factors such as the data’s importance to the organization, confidentiality, and regulatory requirements.
Microsoft security labels are applied to files and emails using Microsoft’s data classification framework. This framework allows you to create rules that automatically apply labels to data based on specific criteria. For example, you could create a rule that applies a “Confidential” label to any file containing credit card numbers.
Once a security label has been applied, it triggers a set of actions based on the label’s sensitivity level, such as triggering encryption or applying a content marking, such as a watermark.
You create and manage sensitivity labels within the Information Protection section of the Microsoft Purview Compliance portal. Labels must be named, defined, and assigned a priority level. Next, your organization will publish the label and label policies–the rules and settings for each label–so that employees can use them in categorizing data and documents.
Sensitivity labels can be applied automatically, retroactively to existing data, or to newly created documents within Microsoft 365 applications, such as Word and Excel.
What are the benefits of using sensitivity labels
Microsoft sensitivity labels are designed to make information protection a seamless part of your data protection strategies. The benefits of using these labels include:
- View how your content is being used and changed – You can generate usage reports that show the activity for all documents, even those that are not sensitive but you may want to track for change management.
- Enables efficient data loss prevention – For regulated industries like healthcare and banking, ensuring patient and customer data is protected is vital. You can enforce data loss prevention policies using sensitivity labels through tools like endpoint protection in Microsoft Intune, which performs actions such as preventing a document from being emailed to a personal account or files being saved on a USB drive.
- Streamlined encryption – Protect sensitive emails by limiting document access only to a specific domain outside your organization or set a time limit for content availability using encryption options.
- Mark sensitive content for clarity - With watermarks, headers, or footers in emails, meeting invites, and documents, employees have a clear understanding of how the document can be used.
- Enables automation, consistency, and efficiency – Create pre-set parameters for detecting sensitive content in emails and documents and trigger auto labeling for more consistent, faster data classification.
- Clear, customizable labels – Create categories for different levels of sensitive content specific to your organization and descriptive labels stored within the file metadata that quickly convey the contents and purpose of the document.
Best Practices for Using Labels in Microsoft 365
To get the most from Microsoft sensitivity labels, your organization should have a clear process for defining and creating labels and policies. Adopting industry best practices set you on a clear path toward consistent adoption throughout your organization.
Configure your labels
Configuring labels is a multi-step process that includes:
- Determining sensitivity labels
- Defining label scope
- Choosing protection settings
- Configuring auto-labeling for files and emails
- Defining protection settings for groups and sites
- Auto-labeling for schematized data assets
Let’s take each of these step by step.
1. Determine the sensitivity levels
Once you created a clear, comprehensive data classification policy, you can use that policy to determine sensitivity labels. Some companies opt to begin using the Microsoft default sensitivity labels, which include:
- Personal - Data that’s not business related but for personal use only.
- Public - Business data created specifically for the public/consumer.
- General - With various tiers, this label is for data that’s not for public consumption but can be shared with external partners.
- Confidential - Also with various tiers, this sensitive business data could cause damage to the business if shared with unauthorized people.
- Highly Confidential - Very sensitive business data that can be set for all employee use or only certain employees.
For many companies, these generic labels may not provide enough context for users to understand the sensitive nature of the information. It may be difficult for employees to decipher what constitutes “Highly Confidential” information or how it is to be used. For example, it could be related to Personally Identifiable Information (PII) and will likely be handled differently than Highly Confidential financial information.
Using custom labels and sub-labels, organizations can provide context on the nature of the sensitive data or reference compliance standards. “Confidential” can include several different sub-labels such as, PII, SOX, PCI, and Intellectual Property. This enables companies to effectively use labels within data loss prevention policies. “Highly Confidential PII” can then be restricted to human resources and benefit providers. These labels can also define the audience, such as “Confidential - All Employees,” “Confidential - Executive Team” or “Confidential - Human Resources.”
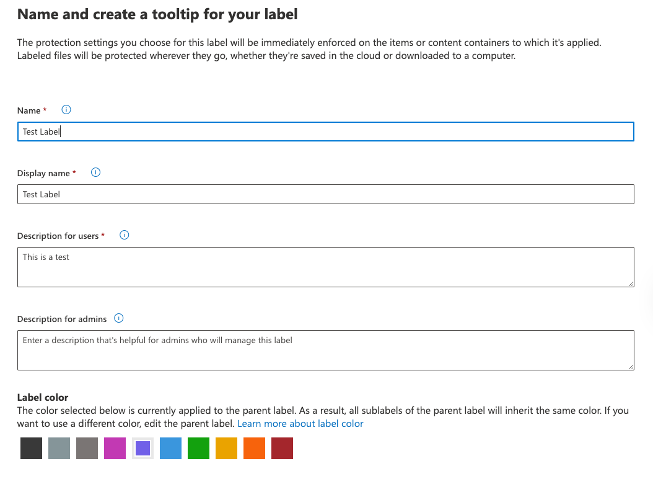
To help ensure consistent adoption, you can use the tooltip to create a label and description, which helps users select the right label [Figure 1]. This includes the label’s name, how it will be displayed to the user, the description users will see, a label color for easy identification, and an admin description for further context.
Figure 1
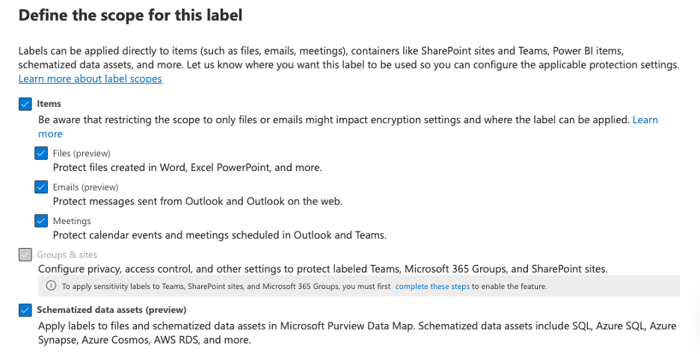
2. Define the label scope
Next, you will determine what content is included within the label. This could include files, emails, meetings, groups, and sites, as well as schematized data assets stored in databases and cloud services.
Keep in mind, the groups and sites option will be grayed out [Figure 2] until you enable the option. You can learn how to enable this feature here.
Figure 2
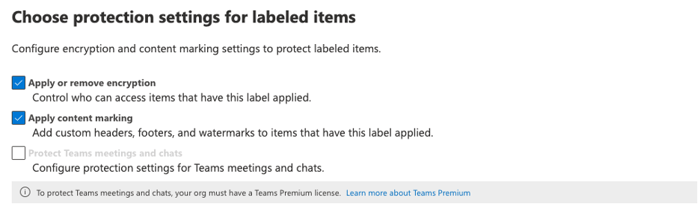
3. Choose Protection settings
Protection settings configure encryption and content markings [Figure 3] for a higher level of control over data integrity and prevent unauthorized access to sensitive data within Microsoft 365 applications. Note that protection settings for Teams meetings and chats require Teams Premium.
This feature allows you to encrypt emails, meeting invites, and documents; choose which users or groups have permissions; and allow users to assign permissions to the content when they apply the label.
Figure 3
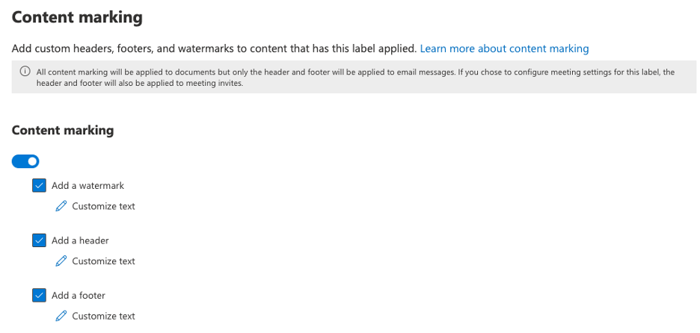
Within Microsoft Office, applying watermarks, headers, and footers to documents provides a clear system for communicating the sensitivity level. Headers and footers can also be added to emails and meetings for greater clarity as well.
Figure 4
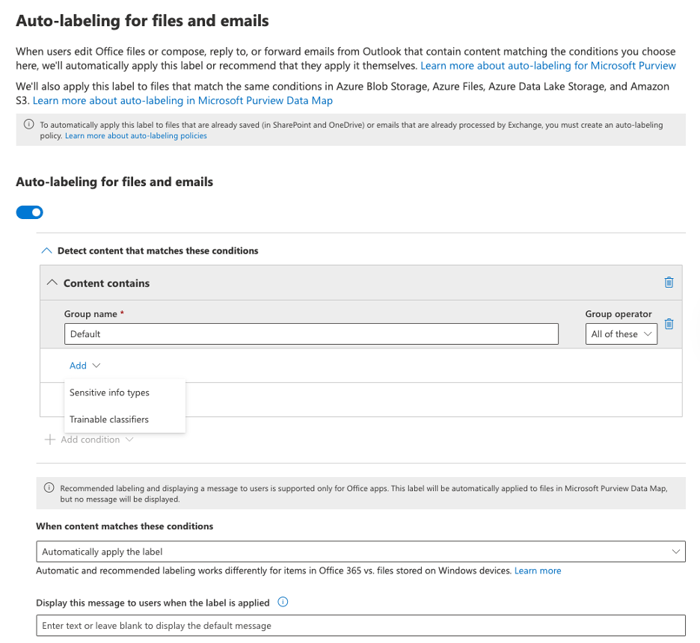
4. Configure auto-labeling for files and email
Auto-labeling is a function that connects sensitivity labels to your data classification policy. When creating your data classification policy [Figure 4], you identified sensitive data types and trainable classifiers. To enable auto-labeling, you need to map these classifiers to the sensitivity labels. The auto-labeling tool can then search emails and files for these classifiers and implement labels when certain data is identified, such as a credit card number or Social Security number.
Figure 5
5. Define protection settings for groups and sites
You can protect content in containers, such as sites and groups, by controlling where content is stored using protection settings.
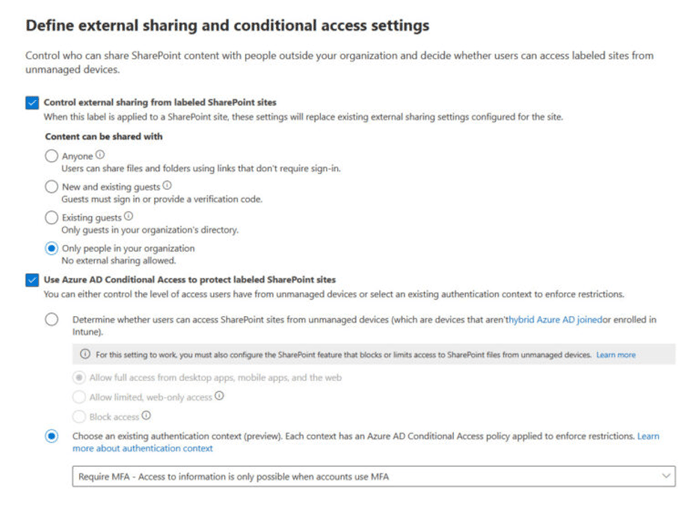
Before you can do this with Microsoft Teams, Microsoft 365 groups, and SharePoint sites, as noted above, you first must enable the capability. Once enabled, you can control internal and external access to labeled teams and Microsoft 365 groups, as well as protect labeled SharePoint sites with Conditional Access settings [Figure 5].
When you set up Azure AD Conditional Access [Figure 6], you create if/then policies that control user access. For example, if a human resources director wants to access PII, then they must use multi-factor authentication to gain access.
Figure 6
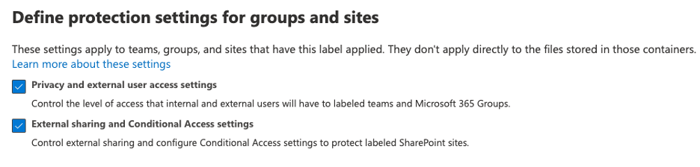
Figure 7
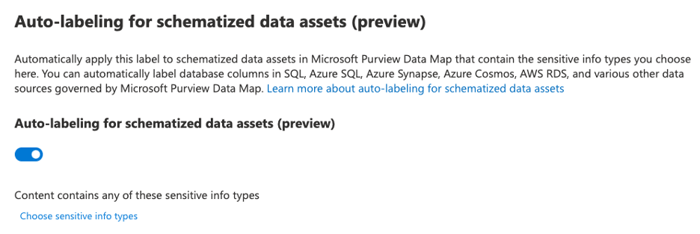
6. Auto-labeling for schematized data assets
A new feature currently in preview allows labels to be applied to files in storage, such as Azure Data Lake, Azure Files, or schematized data such as columns in Azure SQL Database. When using Purview to apply auto-labeling [Figure 7], labels can be applied globally across multiple platforms.
Figure 8
Test & Refine
Categorizing content using sensitivity labels requires a number of integrations and enabling the right settings to ensure these labels are working the way you intended. This requires testing and adjusting once your sensitivity labels have been created.
We recommend conducting a pilot program to ensure that the labels are effective and are being applied correctly. As part of the pilot, start with one or two labels at a time and apply only to files or emails, but not both. It’s important to understand the volume, nature, and location of labeled content before expanding its usage. An incremental approach will ensure a smoother and reliable outcome.
Why Use a Security Partner to Develop Your Labels
Sensitivity labels are just one piece of your data security strategy, and to be effective, organizations must take a holistic approach when creating them. This is where a security partner can be invaluable.
AdaptivEdge has significant in-house expertise to efficiently and effectively create and apply sensitivity labels. Our comprehensive approach ensures data throughout the organization is secure, and that labels reflect the needs of the business.
In addition, our extensive knowledge of the Microsoft 365 platform enables us to make the most of its tools and settings, such as using Azure AD to protect connected SaaS apps, offering advice on seamlessly implementing Microsoft Authenticator advanced multi-factor authentication, or using Microsoft’s cybersecurity and threat protection tools.
Our recent whitepaper, How to Build and Maintain Your Data Retention Policy 2023 Microsoft Information Protection Assessment Guide, offers deeper insights into how your organization can build a comprehensive information protection strategy. This guide gives you the latest information on Microsoft's security features so that you can easily develop and implement your information security policies.
Download the whitepaper here to learn more.